 As usual, I like coming up with my own dog sweater patterns so when a friend got a new dog before Christmas, I knew I wanted to come up with something cute for him. They live in Seattle so it didn't need to be super warm. I went with wool though since it stays warm even when wet. We all know Seattle gets wet. haha After finding some great self-patterning wool, I decided to try a blanket style sweater in stockinette stitch to take full advantage of the pattern of the yarn. Here's what I came up with:
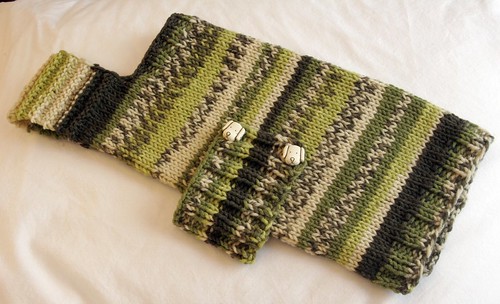 Simple design, knit all in one piece and shows off the pattern of the yarn nicely.
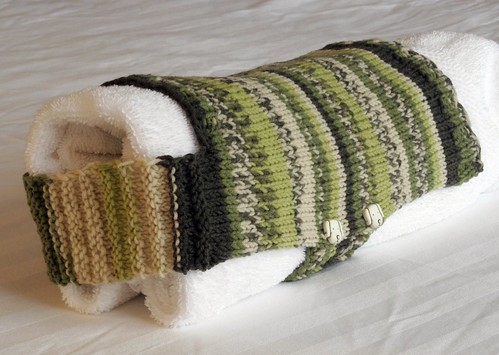
Not sure I'm in love with the front. Actually, I know I'm not. I'll change that the next go-round. Maybe stockinette with ribbing just at the edges? This works though. And just a simple graft at the front to avoid seams.
PATTERN
CO 54 st. Work 2x2 rib for 1".
Work stockinette for 3", slipping first st each row (knit-wise on RS, purl-wise on WS), ending on a WS row.
Turn your work to the RS and add on 26 stitches (I used the knit-on method), placing a stitch marker before the added-on stitches.
1) Right side band row: (k2,p2) 6 times, k2, slip marker, k to end of row
2) Wrong side band row: slip first st pw, p to marker, (p2,k2) 6 times, p2Button hole row - (k2,p2) 6 times, k2, slip marker, k until 4 st left on left needle, YO, k2tog, k2
Repeat band rows 2 & 1 until belly band measures 2", ending on a WS row.
Repeat button hole row.
Repeat band row 2.
Next row, bind off in pattern until you reach the st marker (54 st remaining).
Continue in stockinette until you have about 2" past the belly band, ending on a WS row.
1) RS neck band row: Sl1kw, k15, *p2, k2* 5 times, p2, k162) WS neck band row: Sl1pw, p15, *k2, p2* 5 times, k2, p16
Repeat neck band rows 1 & 2 twice.
Next row, sl1kw, k14, BO 24 st, k15.
You now have two sets of 15 live stitches each to begin the front portion of the sweater. Transfer half these stitches to a stitch holder. It doesn't matter which side you choose to work from. The front band will be worked from one side and then grafted to the live stitches on the other side.
I worked a 2x2 rib on this sweater, but a simple garter stitch would work just as well. My next sweater will more than likely have a stockinette stitch front with a few stitches of garter stitch at the top and bottom edge to prevent rolling. Or I'll do a 2x2 ribbing lengthwise. The choice is yours.
My front band measures 5" unstretched. If you have the dog you're knitting this for handy, try it on him/her for a good fit.
After knitting the front portion to an appropriate size for your dog (end on a RS row), graft the two sets of live stitches together. I used the tutorial here.
All that's left is sewing the buttons to the belly band. I love that there's absolutely no seaming! I avoid seaming at all costs. haha
Yep, I'll definitely choose another pattern for the front of the next one. This works, but I think one of the other methods might look a bit more polished. I've never been a huge fan of garter stitch and this is just too close. I'd change it if I hadn't already woven in the ends and had it ready to give away. Next time... =)
I love it! Those colors are so great.
ReplyDeleteVery nice. I love the self-patterning wool. Which one did you use?
ReplyDelete