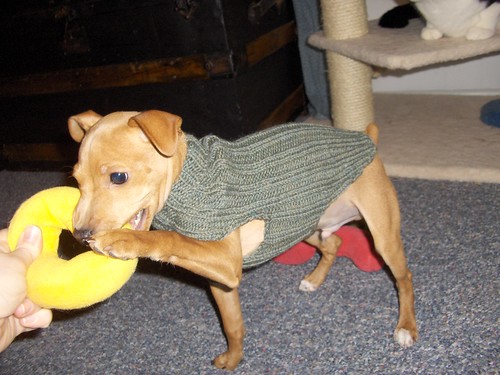
Reilly’s First Puppy Sweater - Pattern
This was my first attempt at making a sweater of any kind and was made up on the fly - no pattern, no solid plan. I wanted a sweater knit in the round (I hate seaming) and with a stitch pattern that had lots of give since Reilly was only 3 months old at the time and had a lot of growing left to do. Nearly all the patterns I had seen were knit flat and pieced/seamed together. I figured I was basically knitting a tube with some increases and leg holes, how hard could it be? The only thing I’d figured out before casting on was that I wanted a 2x2 rib for lots of stretch/room for growth and I had figured out the # of stitches to cast on (from knitting a swatch). I had a plan! Sort of. =) The rest I made up as I went along…
The following will make it MUCH easier for you to figure out the sizing for your own dog - no matter what their size - and take the guesswork out of it.
Materials:
Yarn: This is up to you. A worsted weight works well, but since you’ll be determining the # stitches/rows, this will be easily adapted to whatever you choose. A softer (stay away from the rough stuff!) wool or a wool blend will be the warmest for your dog. Reilly’s sweater was knit with superwash wool on size 7 DPNs.
Needles: set of DPNs appropriate for chosen yarn/circulars may be used for larger sizes
Stitch Markers
Stitch Markers
Instructions:
First, knit a swatch in 2x2 ribbing to determine your gauge.
Do not stretch out your swatch before measuring if this is being knit for a growing puppy or it won’t fit for long. I pretty much didn’t stretch mine out at all and it fit Reilly until he was about 1.5 times his original weight/size. Ribbing gives LOTS of stretch. =)
Stitches per inch: ____
Rows per inch: ____
Rows per inch: ____
Now, take the following measurements on the dog you’re knitting for and convert to number of stitches/rows per your gauge in you swatch:
A) Neck circumference: ____” = ____ stitches (round up if needed to get multiple of 4)
B) Chest circumference: ____” = ____ stitches (round up if needed to get multiple of 4)
C) Distance from throat of sweater to front of leg less 1” : ____” = ____ rows
(Throat would be wherever you want it to hit - mid neck works well unless it’s a puppy, then I’d measure to just under the jaw and make it a turtle neck until he/she grows into it. You are subtracting 1” for the initial ribbing prior to working increases.)
(Throat would be wherever you want it to hit - mid neck works well unless it’s a puppy, then I’d measure to just under the jaw and make it a turtle neck until he/she grows into it. You are subtracting 1” for the initial ribbing prior to working increases.)
D) Subtract A from B to determine number of stitches you will need to increase over number of rows C. (B-A = ____ stitches)
E) Distance between legs: ____” = ____ stitches
F) Distance across front of each front leg: ____” = ____ stitches
(You’ll be binding off this # of stitches for each leg hole - I would add a few stitches here as you don’t want the leg holes to be too tight. Maybe add half an inch to an inch or so on a large dog.)
(You’ll be binding off this # of stitches for each leg hole - I would add a few stitches here as you don’t want the leg holes to be too tight. Maybe add half an inch to an inch or so on a large dog.)
G) Distance front to back of each front leg: ____” = ____ rows
(From the front of the leg to the back of the leg. This section will be knit flat/back and forth before rejoining in the round just behind the front legs. You’ll want to leave a bit of extra room here as well for the comfort of your dog.)
(From the front of the leg to the back of the leg. This section will be knit flat/back and forth before rejoining in the round just behind the front legs. You’ll want to leave a bit of extra room here as well for the comfort of your dog.)
H) Distance from behind front leg to point where the sweater needs to end on your dog’s chest/belly. ____” = ____ rows
(For females, you can measure to just in front of the hind legs. For males, you’ll have to leave more room to take care of business.) =)
(For females, you can measure to just in front of the hind legs. For males, you’ll have to leave more room to take care of business.) =)
I) Distance from the point you ended the belly of the sweater to the base of the tail: ____” = ____ rows (This portion will be knit flat/back and forth as well.)
Now you’re ready to get started!
Cast on A number of stitches in whatever stretchy cast-on you prefer (do a search online or in a stitchionary if needed for an appropriately stretchy method - choose one recommended for ribbing). Join in round, being sure not to twist. Work in 2x2 rib for 1”. Begin working in D increases in chosen method (see next paragraph) and continue in pattern for C inches/rows, ending at center of chest.
* Increases may be made in a couple of ways. You could add stitches at the front/throat only by creating new ribs in a V pattern (I did this on Reilly’s first one) working the rest of the round in the 2x2 pattern or you can increase within the ribbing (easier, I think, and results in fewer increase rounds since you can increase more than a few stitches per round). Increase your ribbing from 2x2 to 2x3 or 3x3 (or more depending on how many stitches you need to increase). Decide how you would like to work your increases and determine how many increase rows you will need. If increasing rib from 2x2 to something larger, increase to 2x3 in one row and then 3x3 in a later row and then 3x4 and so on - evenly space these increase rows over distance C. Depending on your chosen method, you may be working increases every couple rows or every 10 rows or more. It’s up to you to decide this. When your work measures C + 1”, you should have B stitches on your needles.
Now it’s time to bind off for the leg holes.
Continue in pattern for half of E stitches (E/2). Loosely bind off F stitches (use larger needle if needed - you want this to stay loose/stretchy). Now add E + F and count back this number of stitches to determine placement of outside of other leg hole. Place a split ring stitch marker or piece of contrasting yarn here. (Counting back now will eliminate having to check number of stitches as you work your way around.) Continue in rib pattern until you reach your stitch marker. Loosely bind off F stitches for 2nd leg hole. You should now have E stitches remaining between these bound off sections. This is the section between the front legs.
Continue in pattern for half of E stitches (E/2). Loosely bind off F stitches (use larger needle if needed - you want this to stay loose/stretchy). Now add E + F and count back this number of stitches to determine placement of outside of other leg hole. Place a split ring stitch marker or piece of contrasting yarn here. (Counting back now will eliminate having to check number of stitches as you work your way around.) Continue in rib pattern until you reach your stitch marker. Loosely bind off F stitches for 2nd leg hole. You should now have E stitches remaining between these bound off sections. This is the section between the front legs.
Work flat (back and forth) in rib pattern until this smaller strip equals G plus a few rows (not necessary to add these, but I found it gives a bit more ease in the chest/more comfort for the dog) ending on a right side row. Leave stitches on DPN or place on stitch holder. Cut yarn, leaving a 6-8” tail to be woven in later.
Now, you’ll be working the back section flat as well. Rejoin yarn to back section and work in rib pattern until this larger section equals G, ending on a right side row. Place stitch marker.
Cast-on F stitches to form back of leg hole (use whatever method you prefer, but looser/stretchier is best for comfort). Rejoin to smaller chest section and work in pattern until you reach the 2nd leg hole. Cast-on F stitches to form back of other leg hole. Place stitch marker. Rejoin to back of sweater so you can continue working in the round.
Cast-on F stitches to form back of leg hole (use whatever method you prefer, but looser/stretchier is best for comfort). Rejoin to smaller chest section and work in pattern until you reach the 2nd leg hole. Cast-on F stitches to form back of other leg hole. Place stitch marker. Rejoin to back of sweater so you can continue working in the round.
Now, continue in rib pattern until the section behind leg holes equals H, passing your stitch markers along with each row. Just a reminder, boys need a little more clearance than girls. =)
Once this section equals H, continue in rib pattern across the back of the sweater until you reach the stitch marker on the far side. Bind off (loosely once again) until you reach the 2nd stitch marker. Continue working in rib pattern (back and forth) until the section beyond the bound off stomach equals I. You can also check this length by measuring your dog from shoulder to base of tail and comparing that to the distance from the front of the leg holes to the tail end of the sweater. Should be the same either way. =)
Bind off. Weave in ends. Now try it on your pup and take him/her for a toasty walk! =)
If you want, you can go back and pick up stitches around the front leg holes and add sleeves.
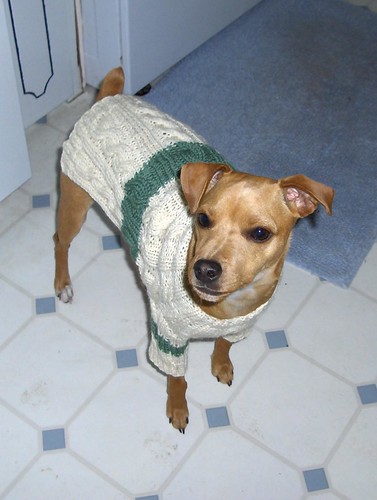
This pattern could easily be adapted to another stitch pattern. Just knit your swatch in whatever stitch pattern you choose and figure your gauge on that. =) Reilly’s 2nd sweater is a cable pattern - he outgrew the first last Spring. I used basically the same method as above, leaving the stitches at the front of the leg live and casting on live stitches as the back of the leg. You do have to take into account the pattern's repeat stitch count and alter your increases into that. It's slightly more complicated than the basic rib pattern, but still not too bad. =)
This pattern could easily be adapted to another stitch pattern. Just knit your swatch in whatever stitch pattern you choose and figure your gauge on that. =) Reilly’s 2nd sweater is a cable pattern - he outgrew the first last Spring. I used basically the same method as above, leaving the stitches at the front of the leg live and casting on live stitches as the back of the leg. You do have to take into account the pattern's repeat stitch count and alter your increases into that. It's slightly more complicated than the basic rib pattern, but still not too bad. =)
I hope I haven't made this harder than it should be. I've never written up a pattern before and this one has so many variables. If anyone has any suggestions for making this pattern better, please let me know. =)
PRINTING INSTRUCTIONS: Sorry, I don't have this available as a pdf at the moment and if you print directly from this page, you will be wasting ink on the background color. You could highlight the text and copy it to your own word processing program to print however. I do know how to make a pdf file, I just don't know where to put it online so I can link to it from here for printing. If anyone has any tips, please let me know!
It's great! Thanks for sharing.
ReplyDeleteWhat a cute sweater! I will definitely be making a few of these. I tend to over groom my Shih Tzus...
ReplyDeleteI just finished a sweater for my Cavalier King Charles Spaniel using your pattern. I posted pictures, too, at http://kendalldog.blogspot.com/2009/11/new-sweater.html
ReplyDeleteI found your pattern on Ravelry, and for the second time while looking for a dog sweater, the pattern was done by a vegan! Yay! I'm a beginner (and yea, a vegan), but your instructions look really good. I'd like to try it if I can figure out how to 'pick up stitches' to make the legs. My kids need sleeves on their sweaters because they like to play in the snow. Thanks!
ReplyDeleteI am so excited to try this for my 8 mo. 11 lbs Oreo, Boston terrier mix. You're pattern is easy to understand and thank you for adding the calculations. I have been looking for a dog sweater and have not found one in the store. I found your pattern on ravelry, I've only knitted hats, scarfs before this! Thank you!
ReplyDelete