Showing posts with label pattern. Show all posts

Wednesday, October 13, 2010

Wrapped in love

Or at least alpaca and bamboo. =)

Last winter, a friend saw my then newly-knit fingerless gloves and asked for a pair so we went off in search of some great yarn while working in Portland. She picked up two skeins of Qina from Mirasol Yarn, a blend of alpaca and bamboo, in a beautiful charcoal grey. I haven't been knitting much this year so the yarn has been sitting, unloved, for much too long. Now that the temps are starting to drop (everywhere but here apparently), I thought it was time to pull this out and give it a go.

This weekend I finished off a few of my older projects that sat unfinished far too long, with this project as a bit of incentive. I didn't want to start anything new with all the old stuff still sitting there. Mission accomplished and guilt abated. =) So after finishing the others, I cast on the pair of delayed fingerless mitts for my friend on Sunday.... finishing Monday. This yarn is so yummy! Soft and warm. I think they'll be well-received. The pattern I chose, Fetching, knit up incredibly quickly and took only one full skein and just a bit from skein two for the second thumb. They weigh exactly 50g though so had I been careful, I could have used just the one skein after all, but I had fears of running out on that second thumb and having to pick back. heh


Love the picot bind-off!


Since we didn't have a specific pattern in mind all those months ago, she purchased two skeins of this luxurious-feeling yarn. Still having almost a full skein left, I decided I wanted to make something else cozy to go with the mitts. Using the cable pattern used on Fetching, I worked up a pattern for a small cowl/neck warmer with a button closure but didn't like the way it was coming out halfway through so I reworked it into a circular cowl instead and started over. Had to resize it halfway through and start over, but I'm pretty pleased with the results.


Here are the details for A Fetching Cowl:

Yarn is DK weight, size 6 needles (a set of dpns will work, but a 16" circ makes it even quicker!)
Gauge: 25 st and 26 rows to 4" (worked in rib pattern, unstretched of course)
Finished measurements: @17" around and @5" tall (again, unstretched, the rib allows plenty of room to pass over the head)

CO = cast on
BO = bind off
PM = place marker
st = stitches
K = knit
P = purl
C4F = transfer 2 st to cable needle, hold to front of work, K2, K2 off cable needle
C4B = transfer 2 st to cable needle, hold to back of work, K2, K2 off cable needle

CO 110 st in a stretchy CO (I used the cable cast-on)

PM and join in the round.

Round 1 (R1): *K4, P1*, repeat to end of round
Repeat R1 until just before the halfway point. If using my measurements, repeat until your cowl reaches just shy of 2 1/2". (I did this by weight since I was working with a small amount of yarn and wanted to get the most out of it - just weigh the remainder of the ball you're working from and work your cable round when you have a little over half left.)

Cable round: *C4B, P1*, repeat 10 more times, *C4F, P1*, repeat 10 more times.

Repeat R1 for another 2 1/4" (or adjust if you've made yours smaller or bigger).

P 1 round. (This will help a bit with the cowl wanting to roll and make it match if you've used the cable cast-on.)
BO in your favorite stretch manner. Weave in ends. =)

Resizing the pattern -For a larger or smaller cowl, simple add or subtract your CO stitches by multiples of 5 and adjust your cable round to suit your CO number. A multiple of 10 CO stitches will result in an even number of cables leaning right and left, but no one will notice if there aren't an even amount!

Perfect as a set! (And ridiculously quick to knit! Hmm, Christmas gifts anyone?)


Saturday, August 01, 2009

Latest FO - A Mini Media Bag

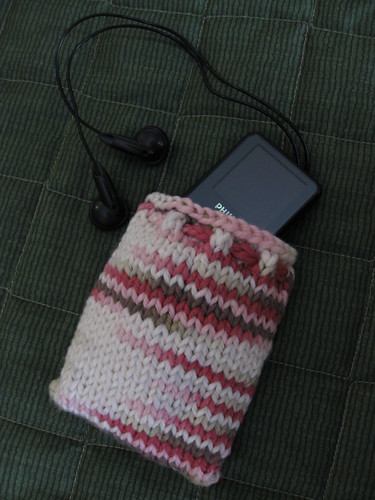
I had a small amount of cotton left from a couple other projects and decided I wanted to use it up. Wasn't sure how many yards I had left (and I was too lazy to measure), so I decided to just wing it and see what I could come up with. =)

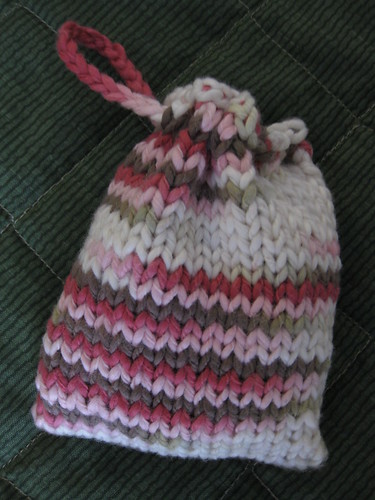
I thought maybe a wrist support for using with my mouse might be useful... but discovered midway through I didn't have enough yarn for that. So then I thought maybe a small bag since that's basically what I had at that point. It ended up the perfect size for my mp3 player and headphones. Only had maybe 1/2" of yarn leftover. It was meant to be. =)


I cast on 32 stitches using the magic cast-on I use for my toe-up socks (16 stitches per needle on US6 dpns) and worked my way up in the round in stockinette stitch until it appeared I had just enough yarn left for a few more rows (lucked out here, eyeballing it really well as it turned out).

At this point, I did one row of *k1 YO K2tog* followed by a row of knit and then cast off.

I left the tail attached and wove it down through a couple stitches until it was even with the holes from the YOs, then made a crochet chain the length of the circumference of the bag and wove it through the holes, attaching the end on the inside of the bag. This created a drawstring without loose ends hanging. I can just pull on a section of the drawstring to close. =)


Basic mindless knitting resulting in a cute, useful little bag and the perfect way to use up a small amount of leftover yarn. I'm guessing I used roughly 15 yds for this bag.

Wednesday, March 04, 2009

Circular Storage

I've been planning to sew up a simple solution for my circular needles with some fabric I rescued from a bag to be donated by my mom - free is the best way to shop, don't you know. =) Anyhoo, someone on Ravelry posted this pattern, made from a pair of old jeans so I went that route instead. The pockets are a nice addition. Great place for the set of interchangable needles I have and a needle sizer and tape measure.

Not quite convinced I love it yet. The needles are a bit crazy. Maybe if they were all shorter cables? Ah, well. It was free to make and for now, it works and doesn't take much space.

Sunday, February 01, 2009

Again with the green...

Yep, more acid green. =) This time around, it's slipper socks!


These are turning out great - so comfy and quick to knit. (Thicker yarn and bigger needles help.) =) I started these before heading back to the airport to head home for the weekend. Finished the first one at home and cast on #2. Should have that one finished well before I arrive back in Seattle.


Notes for me for the future:

Magic CO 16 st on US6 dpns, work toe inc kfb to 48 st, work bottom in stockinette and top in 2x2 rib (k1, p2, k2, etc), work short row heel (7 sp) followed by few rounds in continued pattern then about 2 1/2" of 2x2 rib for cuff

Sunday, January 25, 2009

Tito's Cool Greens Sweater

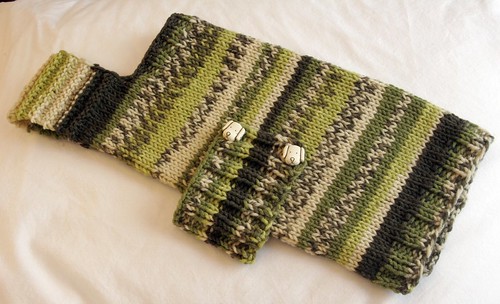
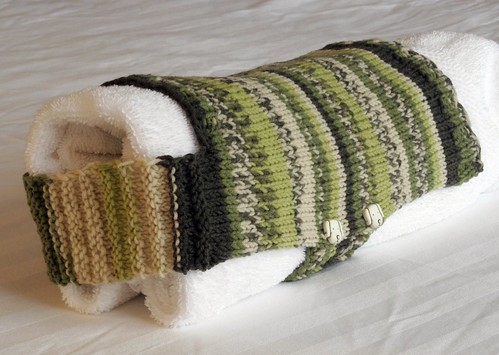
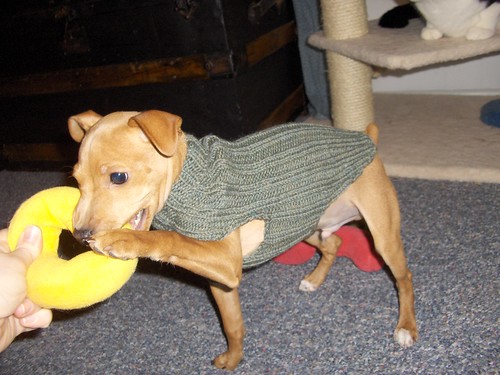
As usual, I like coming up with my own dog sweater patterns so when a friend got a new dog before Christmas, I knew I wanted to come up with something cute for him. They live in Seattle so it didn't need to be super warm. I went with wool though since it stays warm even when wet. We all know Seattle gets wet. haha After finding some great self-patterning wool, I decided to try a blanket style sweater in stockinette stitch to take full advantage of the pattern of the yarn. Here's what I came up with:

Simple design, knit all in one piece and shows off the pattern of the yarn nicely.

Not sure I'm in love with the front. Actually, I know I'm not. I'll change that the next go-round. Maybe stockinette with ribbing just at the edges? This works though. And just a simple graft at the front to avoid seams.

PATTERN

CO 54 st. Work 2x2 rib for 1".

Work stockinette for 3", slipping first st each row (knit-wise on RS, purl-wise on WS), ending on a WS row.


Turn your work to the RS and add on 26 stitches (I used the knit-on method), placing a stitch marker before the added-on stitches.


1) Right side band row: (k2,p2) 6 times, k2, slip marker, k to end of row

2) Wrong side band row: slip first st pw, p to marker, (p2,k2) 6 times, p2

Button hole row - (k2,p2) 6 times, k2, slip marker, k until 4 st left on left needle, YO, k2tog, k2

Repeat band rows 2 & 1 until belly band measures 2", ending on a WS row.

Repeat button hole row.

Repeat band row 2.

Next row, bind off in pattern until you reach the st marker (54 st remaining).


Continue in stockinette until you have about 2" past the belly band, ending on a WS row.

1) RS neck band row: Sl1kw, k15, *p2, k2* 5 times, p2, k16

2) WS neck band row: Sl1pw, p15, *k2, p2* 5 times, k2, p16

Repeat neck band rows 1 & 2 twice.

Next row, sl1kw, k14, BO 24 st, k15.


You now have two sets of 15 live stitches each to begin the front portion of the sweater. Transfer half these stitches to a stitch holder. It doesn't matter which side you choose to work from. The front band will be worked from one side and then grafted to the live stitches on the other side.


I worked a 2x2 rib on this sweater, but a simple garter stitch would work just as well. My next sweater will more than likely have a stockinette stitch front with a few stitches of garter stitch at the top and bottom edge to prevent rolling. Or I'll do a 2x2 ribbing lengthwise. The choice is yours.


My front band measures 5" unstretched. If you have the dog you're knitting this for handy, try it on him/her for a good fit.


After knitting the front portion to an appropriate size for your dog (end on a RS row), graft the two sets of live stitches together. I used the tutorial here.


All that's left is sewing the buttons to the belly band. I love that there's absolutely no seaming! I avoid seaming at all costs. haha


Yep, I'll definitely choose another pattern for the front of the next one. This works, but I think one of the other methods might look a bit more polished. I've never been a huge fan of garter stitch and this is just too close. I'd change it if I hadn't already woven in the ends and had it ready to give away. Next time... =)


Saturday, December 13, 2008

Mom's Hooded Scarf

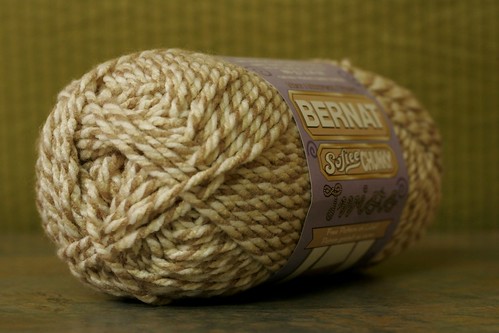
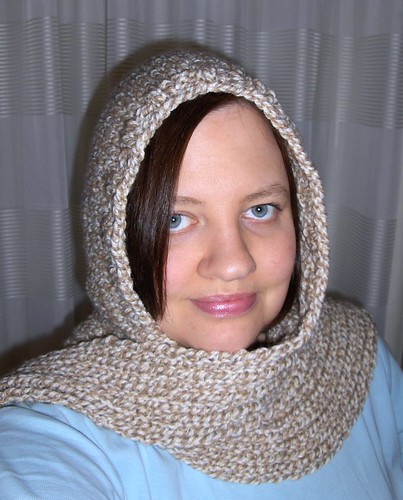
I'd planned a completely different project for my mom for Christmas (a mobius scarf), but she had other ideas... She'd bought a new pair of knitted golves and wanted a hooded scarf to match. I've looked at multiple yarn shops and chain craft stores looking for appropriate yarn to make it out of and finally settled on some Bernat bulky weight yarn in a tan/cream combo. It's not quite what I was looking for, but it's machine washable (her preference) and close enough color-wise to work. So then, I went in search of a simple pattern that I could knit up quickly and wouldn't be too intricate since this colorway doesn't show stitches very well and cables or most other stitches would be pretty much wasted. I found a few sort of promising patterns, but nothing exactly like what I wanted (simple, one-piece, minimal seaming). So... I made up my own pattern. =)

SUPPLIES:

256 yds of bulky-weight yarn (I used 2 full skeins of Bernat Softee Chunky Twists in Taupe Twists with just a few inches leftover)
size US 11 needles (either circular or 14" straights - I started on 14" and then switched to 10" for the scarf since I had both on hand)
2 stitch markers (not necessary but will make this an even easier project)
stitch holder
yarn needle

gauge = 12 sts/16 rows to 4" square (adjust needle size to get gauge)

PATTERN:

CO 90 sts

Row 1 (wrong side): (p2,k2) 4 times, (place stitch marker) p58, (place stitch marker) (k2, p2) 4 times

Row 2 (right side): (k2, p2) 4 times, k58 (to next stitch marker), (p2, k2) 4 times

Repeat rows one and two until hood is within 1" of desired depth front to back, ending on a wrong side row. Mine measured right about 9" at this point.

Ribbing Row 1 (right side): (k2, p2) 22 times, k2

Ribbing Row 2 (wrong side): (p2, k2) 22 times, p2

Repeat ribbing rows 1 and 2. This should give you about an inch of ribbing if using bulky-weight yarn.

Next Row (right side): (k2, p2) 5 times, k2, transfer these 18 stitches to a stitch holder, bind off next 54 stitches in pattern (you should have two stitches left before stitch marker), (k2, p2) 5 times, k2 (18 live stitches left on needle)

Now, you're ready to knit the scarf on one side.

Scarf Row 1 (wrong side): (p2,k2) 4 times, p2

Scarf Row 2 (right side): (k2, p2) 4 times, k2

Repeat scarf rows one and two
until scarf is desired length, ending on a wrong side row.

Bind off
on right side in pattern.
*If you have a limited amount of yarn to work with, knit the first side to the length you think you want and then transfer live stitches to a stitch holder and wait to bind off until second side is completed. Do not cut yarn. Use the free end from the skein to knit the second side. This is the best way to be sure you have enough yarn to knit both sides to the same length - you'll be able to add to or rip back from the first side - and also avoid wasting yarn. I tossed maybe 3" of yarn from the 2nd skein this way. =)

Transfer live stitches from stitch holder to needle and repeat scarf rows until length matches other side, ending on a wrong side row. Bind off on right side in pattern. Bind off first side if not already done.

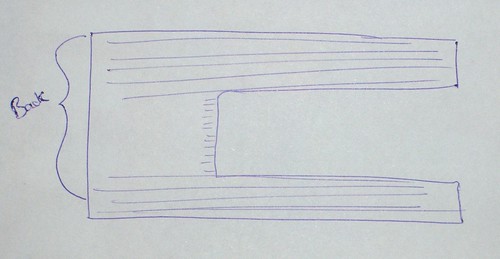
You now have something that looks like this:

Fold in half lengthwise and stitch up back of hat. Weave in all ends.

Finished this in one day. I really like how it came out. =) I think I need to make one for myself... after Christmas.


I'm thinking the next one will have some minor changes. I'll CO 98 sts in order to add another repeat of the rib pattern to the width of the scarf section. I'll need a bit more yardage though.

Sunday, September 30, 2007

Room to Grow Puppy Sweater - Pattern!


Reilly’s First Puppy Sweater - Pattern

This was my first attempt at making a sweater of any kind and was made up on the fly - no pattern, no solid plan. I wanted a sweater knit in the round (I hate seaming) and with a stitch pattern that had lots of give since Reilly was only 3 months old at the time and had a lot of growing left to do. Nearly all the patterns I had seen were knit flat and pieced/seamed together. I figured I was basically knitting a tube with some increases and leg holes, how hard could it be? The only thing I’d figured out before casting on was that I wanted a 2x2 rib for lots of stretch/room for growth and I had figured out the # of stitches to cast on (from knitting a swatch). I had a plan! Sort of. =) The rest I made up as I went along…

The following will make it MUCH easier for you to figure out the sizing for your own dog - no matter what their size - and take the guesswork out of it.

Materials:

Yarn: This is up to you. A worsted weight works well, but since you’ll be determining the # stitches/rows, this will be easily adapted to whatever you choose. A softer (stay away from the rough stuff!) wool or a wool blend will be the warmest for your dog. Reilly’s sweater was knit with superwash wool on size 7 DPNs.
Needles: set of DPNs appropriate for chosen yarn/circulars may be used for larger sizes
Stitch Markers

Instructions:
First, knit a swatch in 2x2 ribbing to determine your gauge.
Do not stretch out your swatch before measuring if this is being knit for a growing puppy or it won’t fit for long. I pretty much didn’t stretch mine out at all and it fit Reilly until he was about 1.5 times his original weight/size. Ribbing gives LOTS of stretch. =)
Stitches per inch: ____
Rows per inch: ____

Now, take the following measurements on the dog you’re knitting for and convert to number of stitches/rows per your gauge in you swatch:

A) Neck circumference: ____” = ____ stitches (round up if needed to get multiple of 4)
B) Chest circumference: ____” = ____ stitches (round up if needed to get multiple of 4)
C) Distance from throat of sweater to front of leg less 1” : ____” = ____ rows
(Throat would be wherever you want it to hit - mid neck works well unless it’s a puppy, then I’d measure to just under the jaw and make it a turtle neck until he/she grows into it. You are subtracting 1” for the initial ribbing prior to working increases.)

D) Subtract A from B to determine number of stitches you will need to increase over number of rows C. (B-A = ____ stitches)

E) Distance between legs: ____” = ____ stitches

F) Distance across front of each front leg: ____” = ____ stitches
(You’ll be binding off this # of stitches for each leg hole - I would add a few stitches here as you don’t want the leg holes to be too tight. Maybe add half an inch to an inch or so on a large dog.)

G) Distance front to back of each front leg: ____” = ____ rows
(From the front of the leg to the back of the leg. This section will be knit flat/back and forth before rejoining in the round just behind the front legs. You’ll want to leave a bit of extra room here as well for the comfort of your dog.)

H) Distance from behind front leg to point where the sweater needs to end on your dog’s chest/belly. ____” = ____ rows
(For females, you can measure to just in front of the hind legs. For males, you’ll have to leave more room to take care of business.) =)

I) Distance from the point you ended the belly of the sweater to the base of the tail: ____” = ____ rows (This portion will be knit flat/back and forth as well.)

Now you’re ready to get started!
Cast on A number of stitches in whatever stretchy cast-on you prefer (do a search online or in a stitchionary if needed for an appropriately stretchy method - choose one recommended for ribbing). Join in round, being sure not to twist. Work in 2x2 rib for 1”. Begin working in D increases in chosen method (see next paragraph) and continue in pattern for C inches/rows, ending at center of chest.

* Increases may be made in a couple of ways. You could add stitches at the front/throat only by creating new ribs in a V pattern (I did this on Reilly’s first one) working the rest of the round in the 2x2 pattern or you can increase within the ribbing (easier, I think, and results in fewer increase rounds since you can increase more than a few stitches per round). Increase your ribbing from 2x2 to 2x3 or 3x3 (or more depending on how many stitches you need to increase). Decide how you would like to work your increases and determine how many increase rows you will need. If increasing rib from 2x2 to something larger, increase to 2x3 in one row and then 3x3 in a later row and then 3x4 and so on - evenly space these increase rows over distance C. Depending on your chosen method, you may be working increases every couple rows or every 10 rows or more. It’s up to you to decide this. When your work measures C + 1”, you should have B stitches on your needles.

Now it’s time to bind off for the leg holes.
Continue in pattern for half of E stitches (E/2). Loosely bind off F stitches (use larger needle if needed - you want this to stay loose/stretchy). Now add E + F and count back this number of stitches to determine placement of outside of other leg hole. Place a split ring stitch marker or piece of contrasting yarn here. (Counting back now will eliminate having to check number of stitches as you work your way around.) Continue in rib pattern until you reach your stitch marker. Loosely bind off F stitches for 2nd leg hole. You should now have E stitches remaining between these bound off sections. This is the section between the front legs.

Work flat (back and forth) in rib pattern until this smaller strip equals G plus a few rows (not necessary to add these, but I found it gives a bit more ease in the chest/more comfort for the dog) ending on a right side row. Leave stitches on DPN or place on stitch holder. Cut yarn, leaving a 6-8” tail to be woven in later.

Now, you’ll be working the back section flat as well. Rejoin yarn to back section and work in rib pattern until this larger section equals G, ending on a right side row. Place stitch marker.
Cast-on F stitches to form back of leg hole (use whatever method you prefer, but looser/stretchier is best for comfort). Rejoin to smaller chest section and work in pattern until you reach the 2nd leg hole. Cast-on F stitches to form back of other leg hole. Place stitch marker. Rejoin to back of sweater so you can continue working in the round.

Now, continue in rib pattern until the section behind leg holes equals H, passing your stitch markers along with each row. Just a reminder, boys need a little more clearance than girls. =)

Once this section equals H, continue in rib pattern across the back of the sweater until you reach the stitch marker on the far side. Bind off (loosely once again) until you reach the 2nd stitch marker. Continue working in rib pattern (back and forth) until the section beyond the bound off stomach equals I. You can also check this length by measuring your dog from shoulder to base of tail and comparing that to the distance from the front of the leg holes to the tail end of the sweater. Should be the same either way. =)

Bind off. Weave in ends. Now try it on your pup and take him/her for a toasty walk! =)

If you want, you can go back and pick up stitches around the front leg holes and add sleeves.
This pattern could easily be adapted to another stitch pattern. Just knit your swatch in whatever stitch pattern you choose and figure your gauge on that. =) Reilly’s 2nd sweater is a cable pattern - he outgrew the first last Spring. I used basically the same method as above, leaving the stitches at the front of the leg live and casting on live stitches as the back of the leg. You do have to take into account the pattern's repeat stitch count and alter your increases into that. It's slightly more complicated than the basic rib pattern, but still not too bad. =)


I hope I haven't made this harder than it should be. I've never written up a pattern before and this one has so many variables. If anyone has any suggestions for making this pattern better, please let me know. =)


PRINTING INSTRUCTIONS: Sorry, I don't have this available as a pdf at the moment and if you print directly from this page, you will be wasting ink on the background color. You could highlight the text and copy it to your own word processing program to print however. I do know how to make a pdf file, I just don't know where to put it online so I can link to it from here for printing. If anyone has any tips, please let me know!